Amazon Web Services – WorkMail
Amazon WorkMail is formerly derived as Zocalo. It is one of the calendaring and controlled email services that run in the cloud. It offers security controls, and they are developed to work with Mac-based outlook clients and existing PC. It also includes prepackaged click to run versions. The WorkMail also works with mobile clients who speak the protocol of Exchange ActiveSync.
The WorkMail is also one of the migration tools which enables moving the mailboxes to the service from the on-premises email servers. It is capable of working on any devices which support the protocol of Microsoft Exchange ActiveSync, namely Apple iPhone, iPad, Windows phone, and Google Android. In this tutorial, we will learn about the Amazon Web Services WorkMail in detail.
Using the Amazon WorkMail:
Proceed below to find out the steps of using the Amazon WorkMail in detail.
- Make use of this link https://console.aws.amazon.com/workmail/ to log in to the AWS account and click on the Amazon WorkMail console.
- You will find a get started button in the console, click on that to begin the process.
- Choose the right option and then select the region on the navigation bar’s top right-hand side.
- Fill all your details and then go to the next step.
- Now you are going to configure your account. Follow the instructions there and complete the process.
- At last, you will find the mailbox arranged in the right way with all properties enabled.
What are the features of Amazon WorkMail?
Amazon WorkMail supports both mobile devices and desktop versions, it also centralizes calendar services and centralized back end management over email. The end users can contact the current email client as same as they would do for the last versions. WorkMail also runs the same on storage management as well as a back end to enable security.
The end users can make use of their calendar, contacts, and email through the Amazon WorkMail web or mobile applications. The user will be able to control their settings like shared calendars and automatic emails. AWS Management Console help to make this service available. Apart from this, there are many features of Amazon WorkMail available. Here are some of them.
Managed service:
Amazon WorkMail provides full management over the email, and therefore you need not worry regarding the software installation, taking care of the installation, and managing them in the right way. Amazon Workmail is capable of handling all these requirements automatically.
Availability:
The users can synchronize contacts, calendars, and emails automatically with Android, iOS, Windows phone, and more with the help of the Microsoft Exchange ActiveSync protocol.
Secure:
Amazon WorkMail encrypts the complete data using the encryption keys automatically with the help of AWS vital management service.
Accessibility:
Amazon WorkMail enables Microsoft Outlook on Mac OS X and Windows. It means the user can make use of the already present email clients without any special requirements.
Affordable:
The price of the Amazon WorkMail is about $4 per user, and it includes a storage of 50 GB per month.
Active Directory integration
Amazon WorkMail integrates with already present Microsoft Active dictionary securely, and therefore the user will be able to access their mailbox with their current details. It also makes managing groups and users easy for different system management tools like computers and Active directory users.
What are the functions of Amazon WorkMail?
There are different functions of Amazon WorkMail, and I have listed some of them below.
- Compatible with Microsoft Outlook
- Active Directory Integration
- IMAP Protocol Support
- Feature-rich web client
- Ample storage for Mailboxes.
- Enterprise-Grade Security
- Journaling
- Administrative SDK
- Interoperability with Microsoft Exchange Server
- Remote Management
- Protection against Viruses and Spams.
I hope the above tutorial helped you to know about the Amazon Web Services- WorkMail. Any queries on WorkMail? Ask us in the comment section below.
Step 1 – Set up your organization
Before we can create user accounts we need to create an organization.
1) Login into the AWS Management Console and click on WorkMail

2) Click the button Get started and select Quick Setup on the next page

3) Enter your company name as Alias and click on the Create button

Step 2 – Add and verify your domain
1) Select your created organization and navigate to Domains on the left menu

2) Click on the button Add domain and enter your domain name

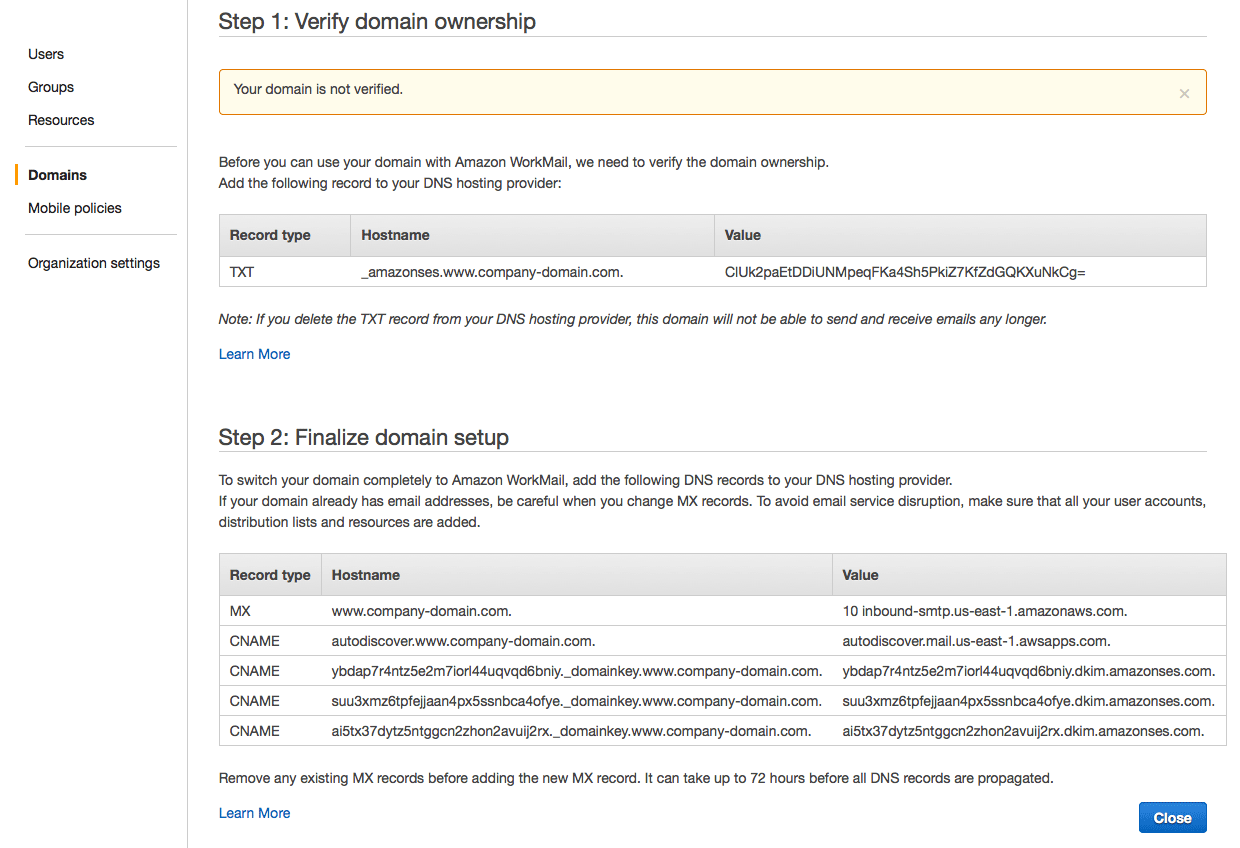
3) Verify domain ownership by setting MX, txt and cname records

Step 3 – Add user accounts
1) After successful verification, we are now ready to create email accounts.
2) Click on Users on the left menu and click on Add user
3) On the next screen, you will be asked to create users in your directory or to select users from a directory.
4) Select “Create a new user in your directory.” and continue with the Create Button.

5) In the last step, you enter a password for the user.

6) You can now receive emails with any mail program you like e.g. Apple Mail. Make sure to select Exchange as an account provider when adding a new account.

